Quantil Documentation
Creating a New Server Certificate
There are three ways to create a new server certificate:
- Auto-generate a self-signed certificate. Use this method if you need a certificate signing request (CSR) to apply for a certificate from a certificate authority (CA). You can then download the CSR of the new self-signed certificate and submit it to the CA. When you receive the CA-signed certificate and chain certificate(s), you can upload them as a new version.
- Upload the private key, certificate, and chain certificate(s). Use this method if you already have a certificate with a private key and CA chain certificate.
- DNS-01 Challenge Option. Use this method to have CDN Pro automatically create a certificate supporting each of your hostnames after verifying your ownership of them.
Auto-Generating a Self-Signed Certificate
The following procedure describes how to generate self-signed certificates. Self-signed certificates can be used for testing purposes or internal use before deploying the certificate into the production environment. If you need a CSR to obtain a signed certificate from a CA, create a self-signed certificate first.
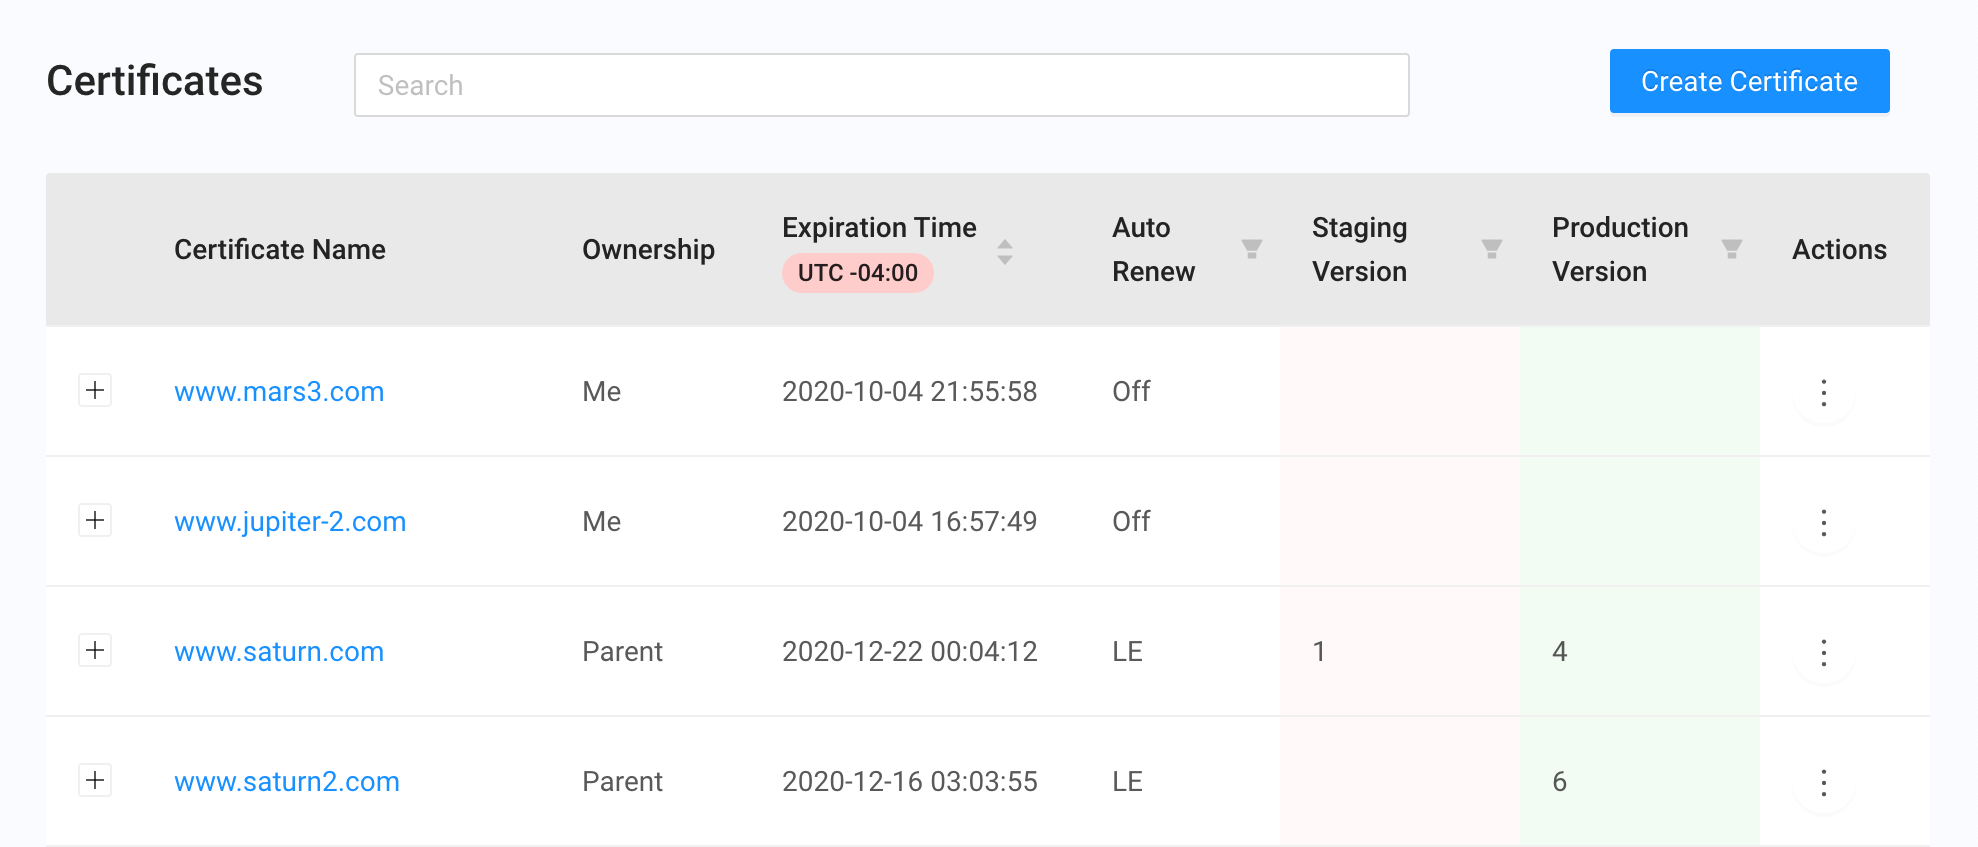
- In the left pane, click Certificates and choose Server Certificates.
- At the top right of the Certificates page, click the Create Certificate button.
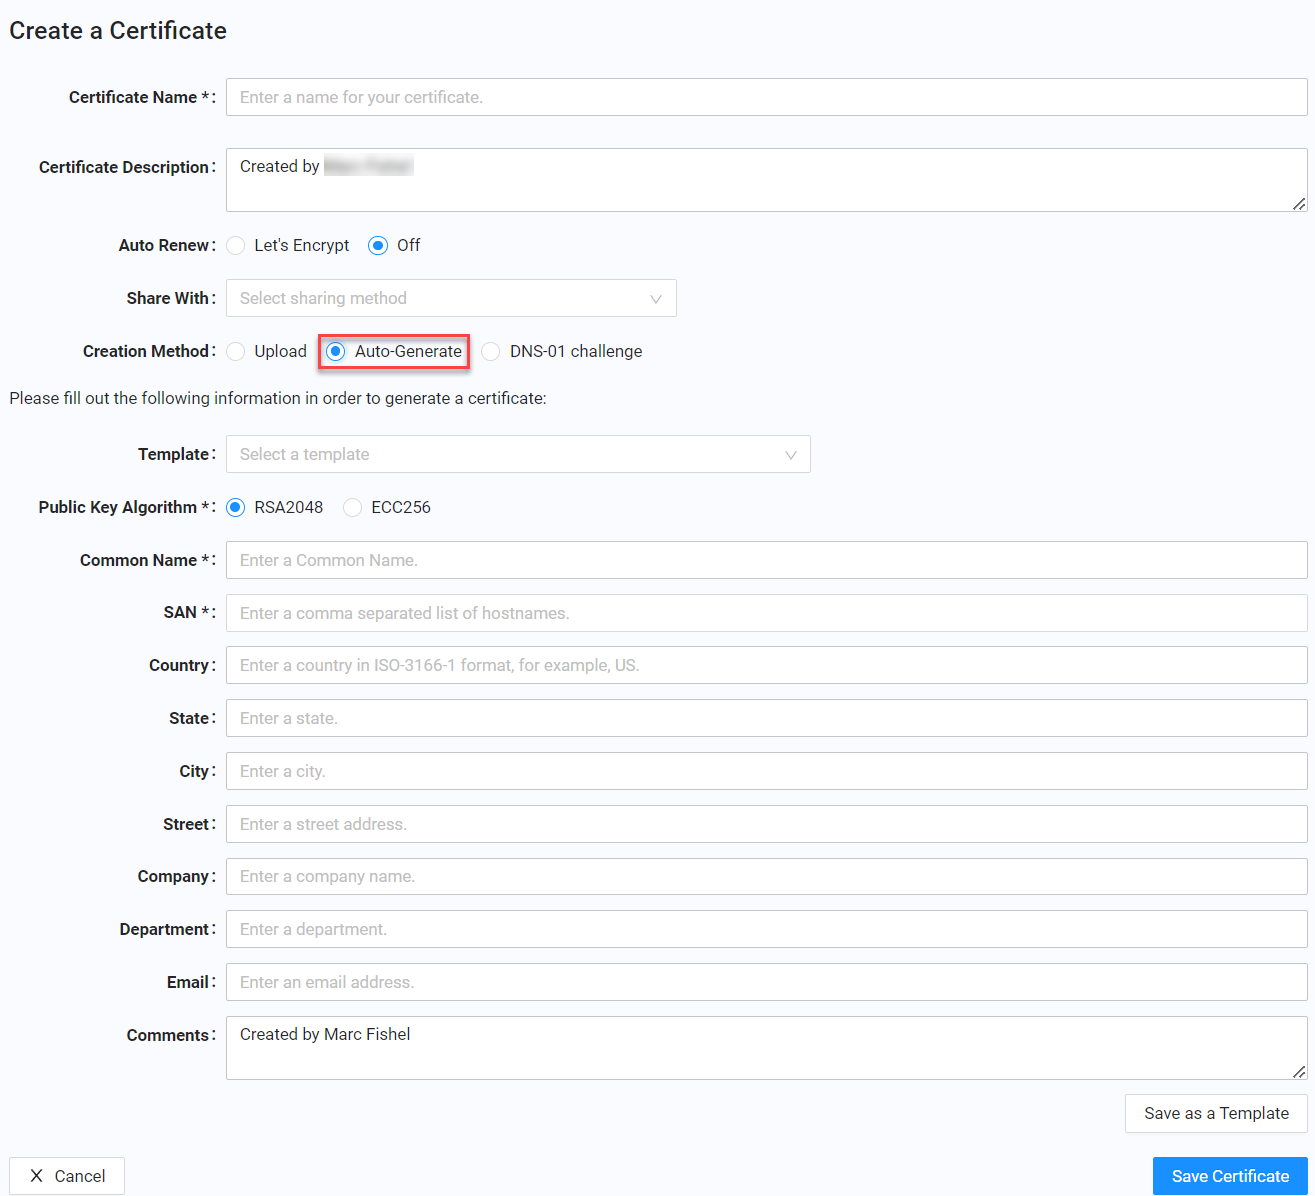
- Complete the fields at the top of the Create a Certificate form. Next to Creation Method, click Auto-Generate and complete the additional fields. Required fields are denoted by an asterisk (*).
| Fields | Description |
|---|---|
| Options at the top of the Create a Certificate Form | |
| Certificate Name | Enter a name that helps you identify this certificate. |
| Certificate Description | Add a description about this certificate. |
| Auto Renew | Select whether you want CDN Pro to renew the certificate automatically through Let's Encrypt (LE). |
| Share With | This field is available to resellers only. It allows resellers to select the child customers with whom they want to share the certificate. |
| Creation Method | Select Auto-Generate. |
| Auto-Generate Options | |
| Template | Populates the form fields with settings from a template. A template is a collection of frequently used settings. Before you use this option, you must save at least one template (see step 4 below). After the fields are populated with the settings from a template, you can change them in the fields below to suit your requirements, and then save the settings in a new template. |
| Public Key Algorithm | Select a public key algorithm for this certificate: RSA2048 or ECC256. |
| Common Name | Enter a common name you want to use for the certificate (can be any text). |
| SAN | Enter one or more Subject Alternative Names (SANs), which will be the hostnames you want this certificate to cover. |
| Country | Enter the name of a country in two letter ISO-3166 country code format. |
| State | Enter the name of a state. |
| City | Enter the name of a city. |
| Street | Enter the name of a street. |
| Company | Enter a company name. |
| Department | Enter a department name. |
| Enter an email address. | |
| Comments | Optionally, enter any comments about this initial version. |
- To save these settings in a template that you can select at a later time using the Template drop-down list mentioned above, click the Save as a Template button. When the popup message appears, enter a name for the template and click OK.
- Click the Save Certificate button followed by OK.
Your certificate is saved and appears on the Certificates page. You can now use the certificate with any properties you create, and deploy it to staging and production environments. You can also download the CSR to apply for a signed certificate from a CA, and then upload it to create a new version of this certificate.
To use the server certificate in a property, choose the certificate in the TLS Certificate or Additional TLS Certificate fields of the property configuration.
Uploading an Existing Certificate
If you already have a certificate with the private key and the CA chain certificate, you can upload them so they can be used by properties. Before performing the following procedure, make sure the certificate and associated files are in Privacy Enhanced Mail (PEM) format. The files' content should be plain text and begins with five equal signs (=====).
To upload the files as a new certificate:
- In the left pane, click Certificates and choose Server Certificates.
- At the top right of the Certificates page, click the Create Certificate button.
- Complete the fields at the top of the Create a Certificate form (see the table above). Next to Creation Method, select Upload and upload the private key, certificate, and chain certificate. In the Comments field, enter any optional comments. Required fields are denoted by an asterisk (*).
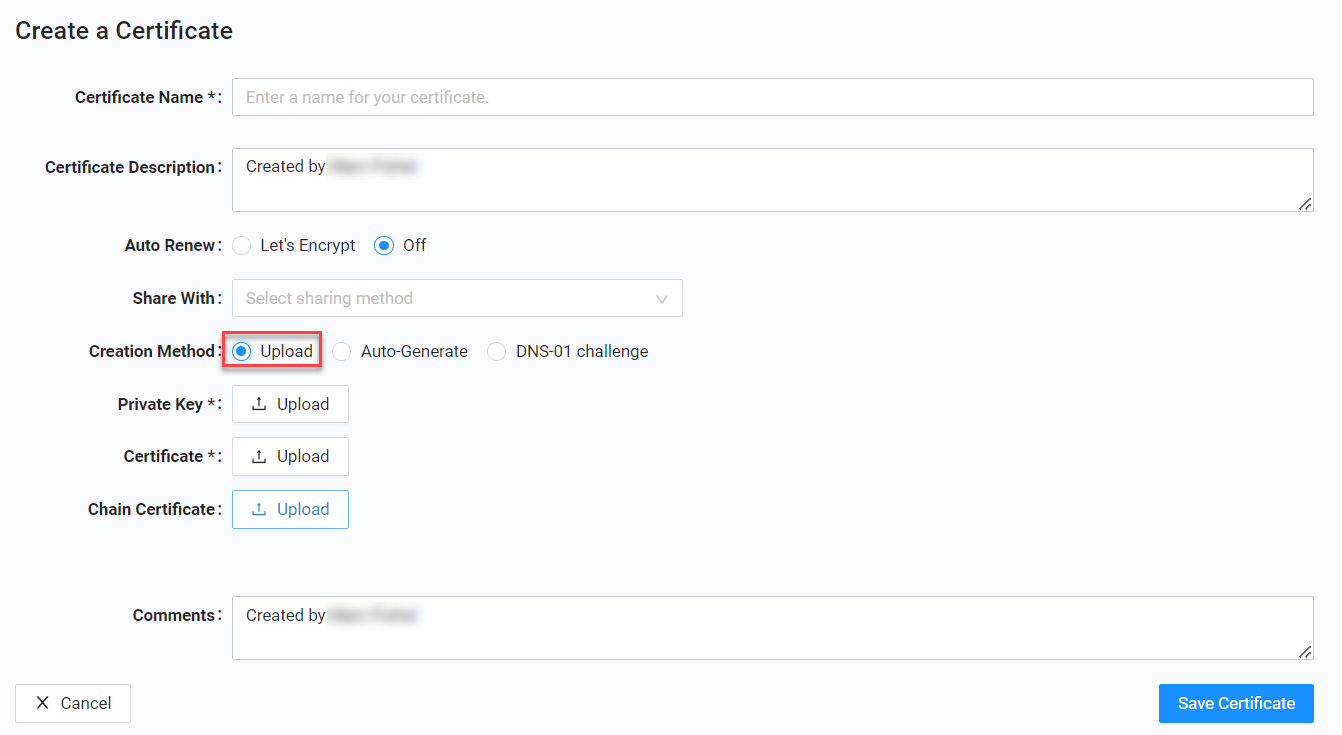
- Click the Save Certificate button followed by OK.
Your certificate is saved and can now be used with any properties you create. To use the server certificate in a property, choose the certificate in the TLS Certificate or Additional TLS Certificate fields of the property configuration.
Automatically Creating a Certificate Supporting Each Hostname
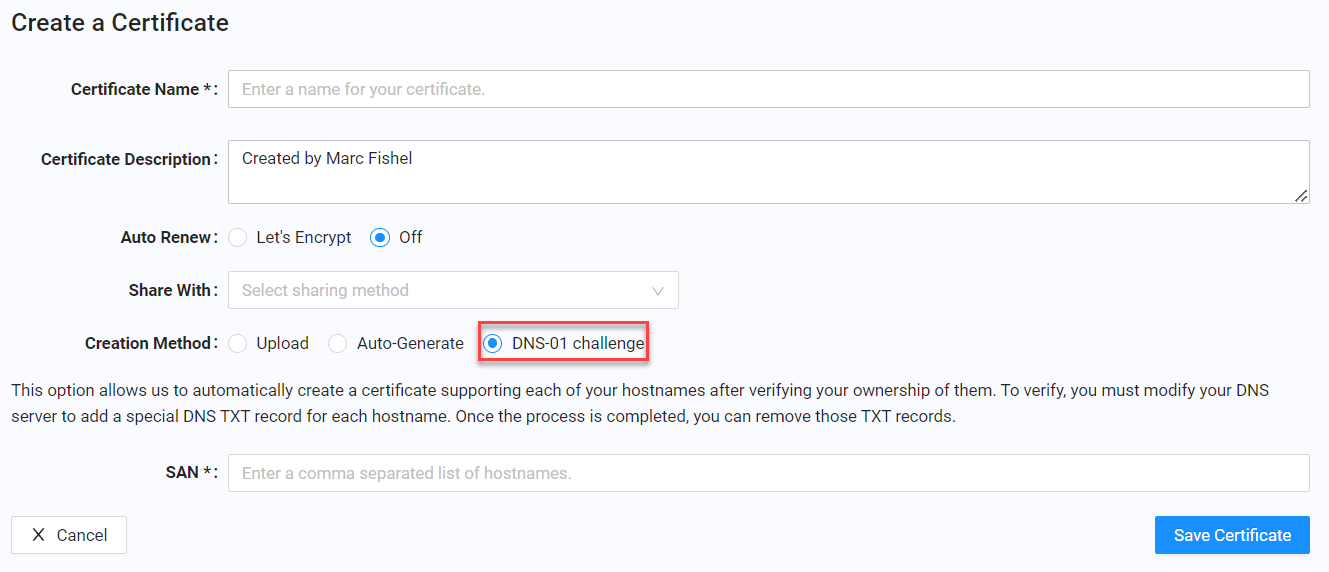
Using the DNS-01 challenge creation method, you can have CDN Pro automatically create a certificate supporting each of your hostnames after verifying your ownership of them. To verify, modify your DNS server to add a special DNS text record for each hostname. Once the process is completed, you can remove those text records.
To automatically create a certificate supporting each of your hostnames after verifying your ownership of them:
- In the left pane, click Certificates and choose Server Certificates.
- At the top right of the Certificates page, click the Create Certificate button.
- Complete the fields at the top of the Create a Certificate form (see the table above). Next to Creation Method, select DNS-01 challenge.
-
In the SAN field, enter a comma-separated list of hostnames.
-
Click the Save Certificate button. A Verifying ACME challenge popup specifies the DNS text records to add to verify your ownership. After you verify the ACME challenge, CDN Pro continues to upload the certificate. After the certificate is uploaded, it is saved and can now be used with any properties you create.
Note: It might take a few minutes for the new DNS records to propagate.